DHT11 & DHT22 Sensors
Complete guide to temperature and humidity sensing with DHT series sensors

Complete guide to temperature and humidity sensing with DHT series sensors
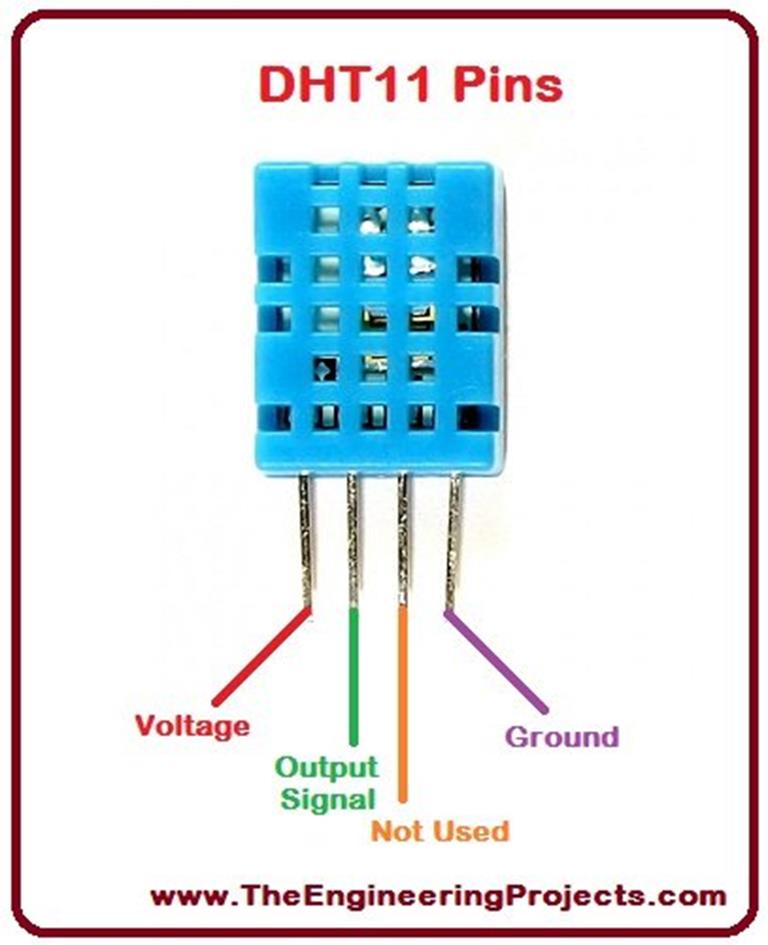
DHT sensors are basic, low-cost digital temperature and humidity sensors that use a capacitive humidity sensor and a thermistor to measure surrounding conditions.
| Parameter | DHT11 | DHT22 (AM2302) |
|---|---|---|
| Temperature Range | 0°C to 50°C | -40°C to 80°C |
| Temperature Accuracy | ±2°C | ±0.5°C |
| Humidity Range | 20% to 80% RH | 0% to 100% RH |
| Humidity Accuracy | ±5% RH | ±2% RH |
| Sampling Rate | 1Hz (1 reading per second) | 0.5Hz (1 reading every 2 seconds) |
| Power Supply | 3-5.5V DC | 3-6V DC |
| Current Consumption | 0.5mA (measuring), 60μA (standby) | 1.5mA (measuring), 40μA (standby) |
| Price | $1-$3 | $4-$10 |

Standard library for Arduino by Adafruit
CircuitPython library for DHT sensors
// Library initialization
DHT dht(DHTPIN, DHTTYPE); // Create DHT object

// In setup():
dht.begin(); // Initialize sensor

// Reading values:
float h = dht.readHumidity();      // Read humidity (%RH)
float t = dht.readTemperature();   // Read temp in Celsius
float f = dht.readTemperature(true); // Read temp in Fahrenheit
float hif = dht.computeHeatIndex(f, h); // Compute heat index

// Error checking:
if (isnan(h) || isnan(t)) {
    Serial.println("Failed to read from DHT sensor!");
    return;
}// Arduino IDE:
1. Sketch > Include Library > Manage Libraries
2. Search for "DHT sensor library"
3. Install "DHT sensor library by Adafruit"
// PlatformIO:
1. Open platformio.ini
2. Add dependency:
lib_deps = adafruit/DHT sensor library@^1.4.4
// Manual installation:
1. Download ZIP from GitHub
2. Sketch > Include Library > Add .ZIP Library
3. Select downloaded file// Basic DHT11/DHT22 Example
#include <DHT.h>
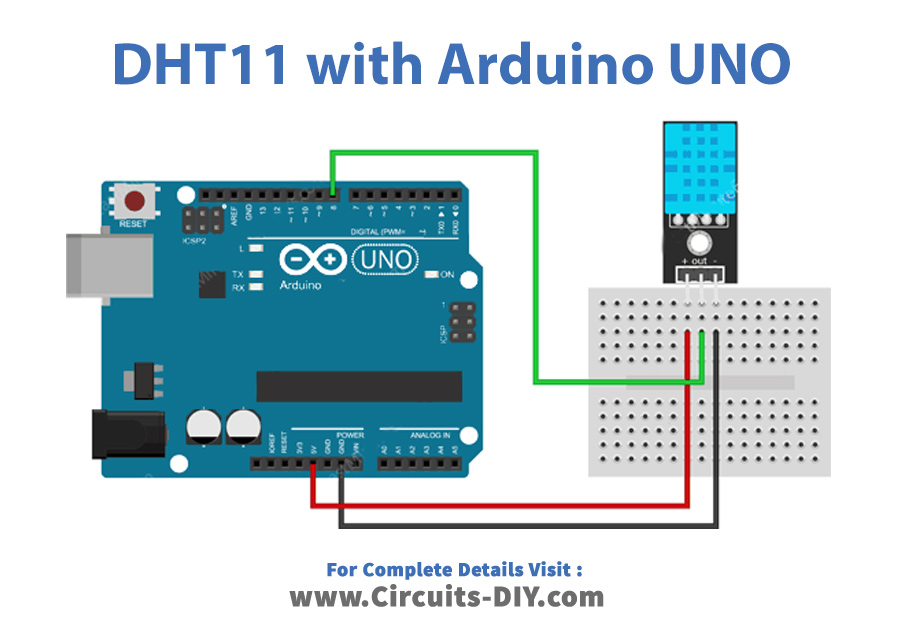
#define DHTPIN 2 // Digital pin connected
#define DHTTYPE DHT22 // DHT 22 (AM2302)
DHT dht(DHTPIN, DHTTYPE);
void setup() {
Serial.begin(9600);
Serial.println("DHTxx test!");
dht.begin();
}
void loop() {
delay(2000); // Wait between measurements
float h = dht.readHumidity();
float t = dht.readTemperature();
if (isnan(h) || isnan(t)) {
Serial.println("Failed to read from DHT sensor!");
return;
}
Serial.print("Humidity: ");
Serial.print(h);
Serial.print("%\tTemperature: ");
Serial.print(t);
Serial.println("°C");
}// ESP8266/ESP32 DHT Web Server
#include <WiFi.h>
#include <DHT.h>
#define DHTPIN 4
#define DHTTYPE DHT22
const char* ssid = "YOUR_SSID";
const char* password = "YOUR_PASSWORD";
DHT dht(DHTPIN, DHTTYPE);
WiFiServer server(80);
void setup() {
Serial.begin(115200);
dht.begin();
WiFi.begin(ssid, password);
while (WiFi.status() != WL_CONNECTED) {
delay(500);
Serial.print(".");
}
server.begin();
Serial.println("Server started");
Serial.println(WiFi.localIP());
}
void loop() {
float h = dht.readHumidity();
float t = dht.readTemperature();
WiFiClient client = server.available();
if (client) {
String html = "<html><body>";
html += "<h1>ESP DHT Server</h1>";
html += "<p>Temperature: " + String(t) + "°C</p>";
html += "<p>Humidity: " + String(h) + "%</p>";
html += "</body></html>";
client.println("HTTP/1.1 200 OK");
client.println("Content-Type: text/html");
client.println();
client.println(html);
client.stop();
}
}# Raspberry Pi DHT22 Example
import Adafruit_DHT
import time
# Set sensor type and pin
DHT_SENSOR = Adafruit_DHT.DHT22
DHT_PIN = 4
while True:
humidity, temperature = Adafruit_DHT.read_retry(DHT_SENSOR, DHT_PIN)
if humidity is not None and temperature is not None:
print(f"Temp={temperature:.1f}°C Humidity={humidity:.1f}%")
else:
print("Sensor failure. Check wiring.")
time.sleep(3)sudo apt-get install python3-pipsudo pip3 install Adafruit_DHT| Issue | Possible Cause | Solution |
|---|---|---|
| Failed to read | Loose connection, no pull-up resistor | Check wiring, add 4.7KΩ resistor |
| NaN values | Timing issues, power fluctuations | Add delay between reads, use stable power |
| Incorrect values | Sensor placed near heat source | Relocate sensor, add ventilation |
| Sensor not responding | Wrong pin specified, damaged sensor | Double-check pin, try another sensor |